The Ultimate Modern Home
California 2018: High design and high performance in the Sierra foothills.
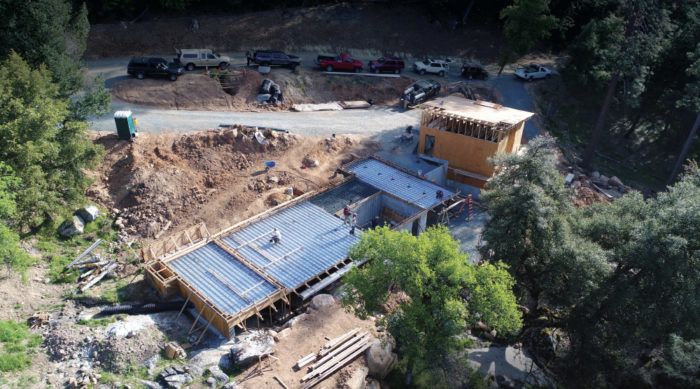
Synopsis: This article is part one of the Fine Homebuilding House: California 2018 build. The house is built in accordance with the new California Energy Efficiency Strategic Plan, which sets the goal that all new residential construction be zero net energy by 2020. The design/construction team, Mela Breen and David Good, describe the foundation and framing of the house, including how they navigated the site and the limited buildable footprint by designing a raised foundation system with a traditional foundation as a “mechanical pit” for the mechanical systems. The team used a system of steel beams and posts and concrete stem walls to support a steel pan deck, on top of which is poured a concrete slab. The article includes detailed drawings of the foundation and steel pan deck as well as the house’s advanced framing components.
As a California design-build company focused on high-performance homes, we have been planning for nearly a decade on the state requiring all new houses to be net-zero energy by the year 2020. At this point, nearly all of our projects are net-zero houses, deep energy retrofits, and Passive Houses. The Fine Homebuilding House—which we call the Good Haus (a play on Dave’s name)—is a zero-net-energy house that far exceeds California’s progressive energy building code.
As this is our own home, it is an opportunity to explore how far we can push the intersection between design and the high-performance construction techniques that we have developed as our firm’s best practices. As the home for our family of four, it embodies our beliefs about resiliency, efficiency, and design. All three of these principles played a part in our unusual approach to the foundation.
Concrete and steel float the house
There are several things to recommend the building lot we purchased: it’s within biking distance to our little town, but outside the planning requirements of its historical district; it has great southern exposure and views across a small valley; and there are beautiful, large granite boulders and a large mossy oak. On the downside, there are large granite boulders! The site is steep, rocky, subject to drainage concerns when it rains, and has a limited buildable footprint.
The traditional way to handle the dramatic 15-ft. terrain drop from the north side to the south side of the house might be to build a walkout basement, but the bedrock and huge granite boulders gave warning to this approach. Because we knew this property to have serious seasonal drainage concerns and that we were likely to encounter giant boulders during excavation, we opted to design a raised foundation system. We designed a 20-ft. by 15-ft. traditional concrete foundation as a “mechanical pit” for the mechanical systems, and we’ll concentrate the plumbing and HVAC runs in the house in a vertical core above this basement.
The rest of the 1700-sq.-ft. footprint is built on a slab, which in this case is 7 ft. in the air. To accomplish this feat, we borrowed a method from the commercial construction world. We used a system of steel beams and posts and concrete stem walls to support a steel pan deck, on top of which we poured a 4-in.-thick concrete slab.
The pan-deck method solves a couple of problems
Mela wanted the house to appear to sit lightly on the lot, while also spanning over the drainage course to the granite outcrop on the west side of the property. We explored some other materials for the elevated floor system, such as cross-laminated timber and SIPs, but a metal pan deck doesn’t require additional moisture protection and the stepped profile has the aesthetic benefit that the metal wall cladding will appear to wrap around to the underside of the building.
One weakness of this assembly is that there’s no access to the floor assembly after construction, and we do have to run some plumbing lines in the floor. We were resigned to having to punch through the floor to fix a leak in the event that we have an issue with the PEX tubing. However, our HVAC contractor, Gavin Healy, came up with an elegant solution: He suggested running the PEX inside PVC electrical conduit that has a negative pitch back to the mechanical pit. Any leaks will drain to the basement and out the floor drain, and because we used sweeping large-radius 90° elbows, we can fish replacement PEX into place easily.
Advanced framing for a strong wall
We use advanced framing principles whenever we build; it cuts lumber out of the build and we can maximize the amount of insulation in the floors, walls, and roof. Where appropriate, we use engineered materials. For the FHB House, we relied on TJI joists to frame the floor and roof systems. I-joists serve two different purposes in the floor system. Above the mechanical pit, they are the structural members of the floor assembly and the 16-in.-deep joists can span the mechanical pit with 24-in. spacing. Above the pan-deck slab, the joists are nonstructural—they rest on 4×4 sleepers directly on the slab. Here, their 14-in. depth allows for a thick insulation blanket and their narrow profile reduces thermal bridging through the assembly.
Our finished floor should be seen, not heard. Consistently sized joists that are dimensionally stable are a good start. Last year we framed a house during the wettest winter we’ve had in over a century and the AdvanTech subflooring was unaffected by the water. So on this house, we used AdvanTech subflooring glued to the joists with Huber’s spray-foam adhesive to prevent squeaks down the road.
We framed the walls with TimberStrand LSL plates. Engineered lumber is straight and available in long lengths, making long walls easier to lay out and straighten. Most of the wall studs are common 2×6 studs, but we used the engineered LSL studs to frame the rough openings for doors and windows. It’s cost-effective to use the engineered wood in these critical areas because it saves us time on the window and door installs. Plus, the straighter walls and plumb openings look better with our minimalist trim.
Our home is in a seismic zone, so we have to comply with our engineer’s shear-wall requirements. In our case, every exterior wall is a shear wall and there are six interior shear panels. We framed these with plywood as we prefer its resiliency to moisture compared to commodity OSB.
We framed our low-slope roof with I-joists for their spanning ability and depth. All of the assemblies—floor, wall, and roof—are framed at 24 in. on center so that each framing member is stacked vertically from the roof through the floor system to efficiently transfer loads. With the stacked framing, the rim joist tying the rafters together at the top of the wall can serve as the header above many window openings when installed with the Simpson Strong-Tie hangers.
Our framing details were chosen to prepare for air-sealing and insulation. Although we’re not pursuing Passive House certification, we modeled the house with many of these benchmarks in mind, and meeting the airtightness and energy-use targets begins with the framing. In the next issue, we’ll explain our approach to air-sealing, insulation, and the low-energy-use mechanical systems that keep us comfortable.
Fine Homebuilding Recommended Products

A Field Guide to American Houses

Smart String Line

Code Check 10th Edition: An Illustrated Guide to Building a Safe House














View Comments
A Lot of useful information here...
Thanks for sharing this useful article. Thank you.