Laying Out the Deck Stair Stringers
For a comfortable stride, plan on a combined unit run and rise of about 18 inches.

The stringer—that notched framing member that supports the treads and risers—is typically made of pressure-treated 2×12. Laying it out is the first, and toughest, step in building stairs.
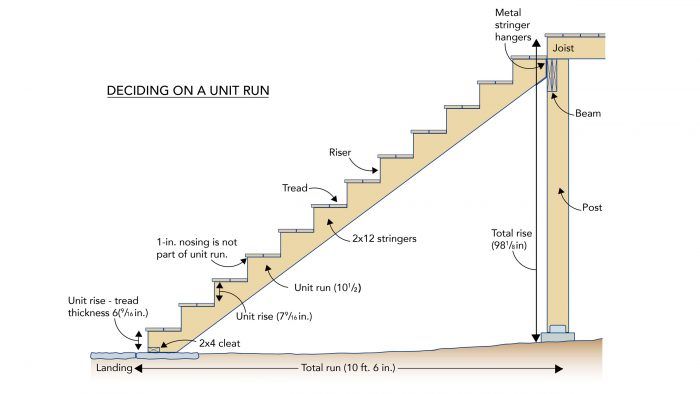
To grasp the theory behind stairs, it helps to understand some stair-building terms. The depth of the tread (the thing you step on) minus the nosing (the amount the tread sticks out) is the unit run, while the height of the riser (the vertical piece that’s perpendicular to the tread) is called the unit rise. The unit rise should not be more than 7-3/4 in. and the unit run should not be less than 10 in. For a comfortable stride, the unit run and unit rise should equal approximately 18 in. The method shown here applies to a stairway of any size.
It takes a bit of trial and error to come up with a rise and run that meets the criteria above. First, pick a proposed total run—approximately how far from the deck you want the stairs to land. In the example shown here, a total run of 10 ft. would put the bottom of the stairs at about the right point on the landing below.
Measure out from the deck to locate the proposed total run, working from the post or posts that will support the stairway. If the stairs are located away from a post, drop a plumb line from the top of the stair header to the ground and stick a nail in the ground to mark this point. Measure out from this point and hold a long 2×4 vertically at the proposed total run. Plumb the 2×4. Standing on a stepladder if necessary, put a line level on a chalkline and stretch the line taut between the top of the stair header and the 2×4. Level the line and mark this point on the 2×4. Measure from the bottom of the 2×4 to the mark. Add in the thickness of your decking material to find your total rise. For the deck shown here, the total rise is 98-1/8 in.
 Because you usually have some flexibility in choosing where outdoor stairs will land, pick a unit run that works well with the material you’ll use for the treads. For example, typical 5/4 x 6 decking is 5-1/2 in. wide. Each tread will have two boards for a total width of 11 in. With 1/2-in.-thick composite risers installed behind the treads, the total comes to 11-1/2 in. Subtract 1 in. for the nosing—the amount the lip of the tread extends beyond the riser beneath it—and you get a unit run of 10-1/2 in., as shown in the drawing “Laying Out the Stringers.”
Next, figure out how many steps you’ll need. For example, for a total run of 10 ft., divide 120 in. by a unit run of 10-1/2 in. to get 11-7/16. Round up and you find you need 12 steps. Multiply 12 by 10-1/2 in. and your actual total run will be 126 in.—10 ft. 6 in.
For a rough idea of how long a 2×12 you’ll need for each stringer, you can measure down from the deck to your landing. However, you might want to do a bit of math on a calculator to confirm what you’ve come up with. Because the total rise and total run form a right triangle with the stringer length as the hypotenuse, you can use the Pythagorean theorem (A² + B² = C²) to calculate the length of the stringer boards you’ll need. For example: Multiply the total run (126 in.) by itself to get 15,876 in. Multiply the total rise (98 in. is close enough) to get 9,604 in. Add 15,876 to 9,604 to get 25,480. The square root of 25,480 is 159.6246 in. or 13.3 ft. Add a 6-in. fudge factor to allow for the final plumb and level cuts to the bottom of the stringer. So, you need 14-ft. 2x12s to make your stringers.
TIPIf you find your rise will be 4 in. high or more, plan on adding a “closed” riser designed to eliminate the chance of small children falling through. Such risers can be made of 1x or, when the stringers are relatively close together, 1/2-in. synthetic fascia ripped to fit. |
Now you are ready to lay out the cuts on the stair stringer. Lay the stringer board on your sawhorses and make the first mark approximately 6 in. from one end to allow for the final plumb and level cuts. If you make the mark closer to the end of the board, you may not have enough room for the bottom riser.
The longer leg of a framing square is called the blade; the shorter leg is the tongue. Align the unit-run measurement on the outside of the framing square’s blade with the first mark, and align the unit-rise measurement on the outside of the square’s tongue to the edge of the board. Draw cutlines for the first rise and run. Now align the unit-run measurement on the blade to the top of the first unit rise. Again, align the unit rise on the tongue to the edge of the board. Draw in the second unit rise and run. Continue this process for as many steps as you will lay out.
To lay out the bottom plumb cut, draw a line extending from the first mark, square to the first unit run. From the first mark, measure down a distance equal to the unit rise minus the thickness of your stair tread stock. From this point, draw the bottom level line that is cut square to the bottom plumb cut. Now lay out the top plumb cut perpendicular to the top unit run. Note that when you cut the stringers, you’ll want to save the top offcut for scribing plumb and level cuts when you make the stringer skirts.
Fine Homebuilding Recommended Products

Cepco BoWrench Decking Tool

Angel Guard Deck Demon

Lithium-Ion Cordless Palm Nailer


