Insulating Rim Joists
Use rigid foam or spray foam, not fiberglass or mineral wool

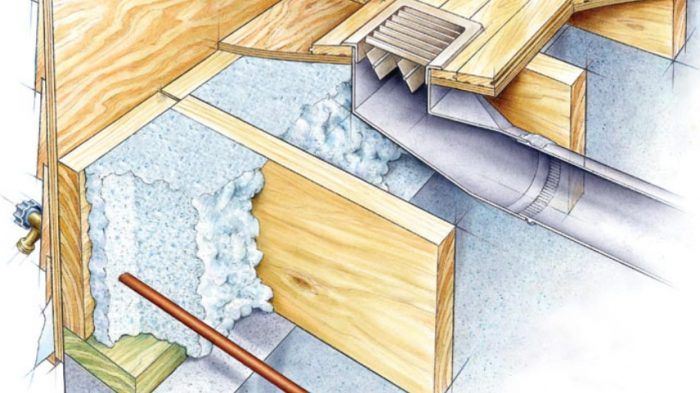
Rim joists make up the perimeter of the floor system of a wood-framed house. Also known as band joists, rim joists are pieces of lumber—either sawn lumber or engineered lumber—that are installed vertically above the mudsill. On a new house, a typical rim joist might be a 2×10 or 2×12. Older houses have all kinds of different rim joists, including 2x6s, 2x8s, or even square timbers like 8x8s. Some older balloon-framed houses lack rim joists—instead, the bottom plates of the wall framing (or the studs) sit directly on the mudsill.
If you live in an older house, it’s important to check whether your rim joists are insulated. In a house with an unfinished basement or crawlspace, inspecting your rim joists should be easy. If your basement has a finished drywall or plaster ceiling, however, you’ll probably need to cut some inspection holes in the ceiling to inspect your rim joists.
Two-story homes usually have another ring of rim joists above the first-floor ceiling. If you need to insulate this type of rim joist, it’s best to hire a cellulose-insulation contractor. (To learn more about the “grain bag” method that cellulose contractors use to insulate rim joists, see “How to Install Cellulose Insulation.”)
Why do we insulate rim joists?
If your rim joist is uninsulated, the only layers between the rim joist and the outdoors are the sheathing, which is typically between ½ in. and ¾ in. thick, the asphalt felt or housewrap, and the siding. Rim joists are above grade, so it makes sense to insulate them to the same level as above-grade walls—a minimum of R-13 in climate zones 1 through 4, or a minimum of R-20 in climate zones 5 though 8.
These days, rim-joist insulation is required by most building codes; in the 2018 International Residential Code (IRC), the requirement can be found in Table N1102.4.1.1.
What’s wrong with insulating rim joists with ordinary fiberglass insulation?
For years, builders and homeowners insulated the interior side of rim joists with ordinary fiberglass batts. While this casual approach to rim-joist insulation works—sort of—in a warm climate, it can be disastrous in a cold climate.
Since fiberglass batts (like mineral-wool batts) are air-permeable, they don’t restrict warm indoor air from contacting the rim joists. In cold weather, condensation or frost can build up on the interior side of a rim joist insulated with fiberglass. In just a few short years, this type of moisture accumulation can be serious enough to rot out the rim joist.
If you live in a cold-climate house with fiberglass-insulated rim joists, you should pull the insulation away and to check the condition of the lumber behind the insulation. You may be surprised to discover dampness or rot, especially on the north side of the house.
There’s another problem with the casual installation of fiberglass batts: The batts do nothing to address air leaks near the rim joist. At the rim-joist area, many building components come together—the foundation wall, the mudsill, the rim joist, and the subfloor—so it’s important to seal all those cracks against air leakage.

Insulating rim joists in an older house
These days, builders know that the best materials to use to insulate the interior of a rim joist are some type of rigid-foam insulation or spray-foam insulation. Using rigid foam keeps the material costs low, but takes more labor than using spray foam. Rigid foam also has a few other downsides: Compared to spray foam, it’s harder to install in awkward areas (for example, in a tight space where a rim joist is close to another parallel joist). Rigid foam is also fussy to install if the rim-joist’s area is cluttered with plumbing pipes or wiring.
Any of the three common types of rigid foam—polyisocyanurate, expanded polystyrene (EPS), or extruded polystyrene (XPS)—can be installed against a rim joist. Polyisocyanurate is considered the most environmentally friendly of the three foam types; it has an R-value of between R-6 and R-6.5 per in. Green builders try to avoid the use of XPS, which is manufactured with a blowing agent that has a high global warming potential. (For more information on this issue, see “Choosing Rigid Foam.”)

In warmer climates, 2 in. of rigid foam may be enough. In colder climate zones, it’s a good idea to install at least 3 in. to 4 in. of rigid foam, either in a single layer or in multiple layers. (To save money, you can install 2 in. of rigid foam followed by a layer of fiberglass insulation. Remember, fiberglass batts should never be installed near a rim joist unless the rim joist is first insulated with at least 2 in. of rigid foam or spray foam.)
The easiest way to hold rigid foam in place is to secure the foam to the rim joist with a couple of cap nails. (Several manufacturers sell cap nails in a variety of lengths up to 8 in.) To ensure that humid indoor air won’t reach the cold rim joist, the crack at the perimeter of each piece of rigid foam (and at any penetrations) should be sealed with caulk or canned spray foam. If you use canned spray foam, you’ll find that wide cracks are easier to seal than narrow ones, so it’s a good idea to cut the rectangles a little small. You may want to buy a few lengths of flexible vinyl tubing with a slightly larger diameter than the plastic nozzle that comes with the can. This will make it easier to reach awkward corners. Discard the vinyl tubing when it gets clogged.
While you’re sealing the perimeter of the rigid-foam rectangles with canned spray foam, you may notice air leaking through the crack between the foundation wall and the mudsill. Now is a good time to seal any obvious air leaks that you may have missed during previous attempts at air-sealing.
Spray foam insulates and seals air leaks
One advantage of using spray foam rather than rigid foam to insulate rim joists is that a single product performs two tasks: sealing air leaks and insulating. In mild climate zones, either open-cell spray foam or closed-cell spray foam will work; however, in climate zone 6 and colder zones, it’s safer to use closed-cell spray foam.
Unless you hire a spray-foam contractor for the job, you’ll probably be buying a two-component spray-foam kit. Well-known brands include Dow Froth-Pak, HandiFoam, Foam It Green, and Touch ‘n Seal. These kits are available at most lumberyards; expect to pay from $300 to $400 for a 200-bd.-ft. kit. If you want to install 3 in. of foam in an area that measures 1 ft. high by 130 ft. long, you’ll need about 400 bd. ft. of spray foam. Once cured, this type of spray foam has an R-value of about R-6.5 per in. (Most two-component spray-foam kits use closed-cell foam.)

If your basement is cool, store your spray-foam kit in a warm location for 24 hours before you begin. Be careful; recently sprayed foam insulation is messy. If you get it on objects in the basement or your skin, the foam may be impossible to remove. Before spraying, clear movable objects from the work area, and use a tarp to protect things that can’t be moved. Wear a respirator, rubber gloves, goggles, a cheap hat, and either a Tyvek suit or old clothes.
To create an effective air barrier, spray foam should extend from the top of the concrete all the way to the subfloor. For good thermal performance, the foam should cover all of the exposed concrete at the top of the wall.
For more information on using a two-component spray-foam kit to insulate rim joists, see Marc Rosenbaum’s article, “Basement Insulation — Part 2.”
What the code says
Most building codes require rigid foam to be protected with a layer of ½-in. drywall as a thermal barrier. The drywall can be screwed to the rim joist through the foam.
Dow Thermax is a brand of polyisocyanurate that includes a facing that has passed fire-safety tests. That means that most building inspectors don’t require Thermax to be protected with a drywall layer, making it a good choice for this application.
Spray-foam requirements differ from those for rigid foam. As long as your cured spray foam is no thicker than 3¼ in., the IRC allows spray foam at the rim joist area to be left exposed, without any protective drywall. The relevant provisions can be found in section R316.5.11 (this can be found in all versions of the IRC, from 2009 through 2018).
What if you don’t have much room to work with?
Perhaps the trickiest type of rim-joist cavity to insulate is a narrow gap separating a rim joist from a parallel joist. Not every house has a tight space like this, but if you have such a space—for example, a gap between adjacent joists that is only 2 in. or 3 in. wide—it’s hard to do a good job with rigid foam. These types of tight spaces are best insulated with spray foam.
Does rim-joist insulation need to be vapor-permeable?
Some homeowners mistakenly assume that rim-joist insulation needs to be vapor-permeable “in order to let a damp rim joist dry.” In fact, rim joists are more likely to be damaged by moisture present in the indoor air than they are to benefit from inward drying. That’s why it makes sense to choose a type of insulation that has a low vapor permeance and is air-impermeable.
In most cases, the layers on the exterior side of the rim joist—the sheathing, housewrap (or felt), and siding—allow outward drying.
Can rim joists be insulated on the exterior?
If you are planning to install a continuous layer of rigid foam on the exterior side of your wall sheathing, the rigid foam can extend all the way down to the level of the mudsill. In that way, the rim joist is protected by a layer of exterior insulation—an approach which is superior in all respects to interior insulation.
If the exterior rigid foam is thick enough to meet your R-value target, you’re done. If you want to add a little R-value, it’s safe to add some fiberglass insulation on the interior side of your rim joist, because the exterior rigid foam keeps the rim joist warm enough in winter to avoid condensation or moisture accumulation.
[Author’s postscript: For more information on insulating rim joists on the exterior, see Comment #7 from Malcolm Taylor, below.]
What about homes that lack a capillary break under the mudsill?
Building codes require the installation of sill seal (a material that provides a capillary break) between the top of a foundation wall and the pressure-treated mudsill. The purpose of the capillary break is to prevent moisture from wicking from the damp concrete foundation to the wooden components of the house.
If you live in an older house that lacks a capillary break between the foundation and the mudsill, the rim joist is at a higher risk of dampness and rot than in a house that includes the capillary break. While an uninsulated rim joist in an older house may have stayed dry and sound for decades, it’s conceivable that the addition of interior insulation could interrupt inward drying, putting the rim joist at risk for rot.
The risk of this type of rot is quite low, but it isn’t zero. Assessing the risk involves judgment. In general, the risk is higher if the basement is damp, if the exterior grade is close to the sill, if the climate is very cold, and if landscaping prevents sunlight from warming the rim-joist area. In most cases, the risk is higher on the north side of a house than on other orientations.
If your basement is dry, and the exterior grade meets modern expectations, you probably don’t have to worry about insulating rim joists that lack sill seal. If you’re worried about the lack of a capillary break above your foundation wall, it’s possible to jack up your house about 1/4 in. so you can slide some metal flashing between the foundation and the sill.
Originally published on GreenBuildingAdvisor.com.
Fine Homebuilding Recommended Products

Respirator Mask

Utility Knife

Caulking Gun


View Comments
Thank you for addressing the lack of a capillary break under the mudsill in older homes.
Well, me thinks that Roxul would not agree, including myself at this time!
"[Author’s postscript: For more information on insulating rim joists on the exterior, see Comment #7 from Malcolm Taylor, below.]"
I'm not seeing this comment, but would love to! Could you please share what this comment said?
Based on this content, I plan to add either exterior 2" foil-double-faced polyiso to the exterior (and standard batting inside the rim via the joist bays) or R6.3 mineral wool on the outside and rigid foam inside on the rim joist, but want to make sure I get it right. This is in the Zone 4 Coastal climate.
Thanks!
Regarding vapor permeance, how many perms is considered low enough for rim joist insulation? A local building science guy is recommending rockwool comfortboard cut to size and pressure fit into the cavities and I'm wondering if that is suitable or not.
I'm located in an area with cold, dry winters (lows of 5F) and warm humid summers (highs of 86F). The house is from 1966 and doesn't have exterior insulation.