Installing Support Beams
Here's how to assemble and set the long built-up beams that bear the weight of the floor framing.

The mudsills support the ends of the floor framing, but most houses require support for the middle of the floor framing as well. Support beams or girders provide that support. A support beam can be made of various materials, including steel, LVL, and glue-laminated 2× stock. Most often, though, it is made from built-up layers of dimensional lumber such as 2×10s or 2×12s.
Locating the support beam
The support beam for this project consists of three layers of 2×12s assembled into a beam 36 ft. long. Lally columns sit on concrete pads or footings and support the beam. The beam ends typically rest in pockets formed directly in the foundation walls. These pockets are oversize to provide an air space around the sides and ends of the beam, a detail that encourages air circulation and discourages rot. Beam pockets are deep enough to allow room under the end of the beam for a moisture-blocking pad.
Before you lay out the position of the beam, check the plans and confirm that the beam pockets are the right size and in the right places. You have some wiggle room but major discrepancies could require new beam pockets or a change in the length of floor joists.
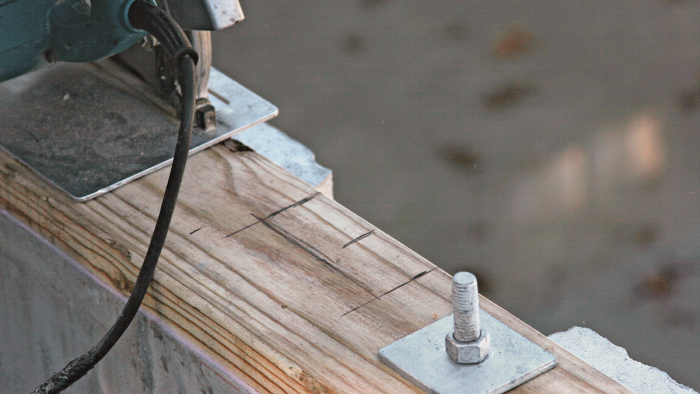
If the pockets look good, lay out the location of the beam on the mudsills. Check the plans for the distance from the front of the house to the centerline of the beam and mark this point on the mudsills at both beam pockets. Now lay out the width of the beam (4½ in. in this case) by measuring from the centerline. We also marked the location for the end of the beam because the 2×6 mudsills overlapped the beam pockets and had to be notched. The layout included a ½-in. allowance for airspace at the end of the beam.
It’s easy to figure out the thickness of the pad under the beam. Simply set a scrap of beam stock on the bottom of the pocket and measure up to the mudsills. A pad exactly this thickness will position the top of the beam flush with the top of the mudsill. Metal plates or a piece of composite decking make a good pad that won’t rot or compress.

Assembling the beam
Once the beam pockets are prepped, determine the exact length of the support beam by stretching a 100-ft. tape between the notches in the mudsills. Reduce this distance ¼ in. to ½ in. at each end so that the beam will slip in easily. Regular lumber doesn’t come in 36-ft. lengths, however, so you have to build the beam out of shorter boards layered together. The joints between the boards should be staggered from layer to layer so that no two joints line up at the same place. And for maximum strength, joints should fall over a Lally column.
Start building your beam by gathering the stock. Check each board for crown by sighting down one edge. The crown is any bow across the width of the board. The crowned edge should face up when the board is installed so that the weight of the building will straighten it. Mark the direction of the crown clearly as you work through a pile of lumber. Keep the straightest boards for the longest lengths; cull the worst boards to be cut into shorter lengths.

Take the location of the support columns from the plans, and cut boards for each layer of the beam. As you cut the boards to length, make sure the ends are square. Label each board to indicate its position both by layer number and sequence in that layer.

On this project, the basement slab provided a nice flat surface to work on. To assemble the beam, we arranged the first layer on the basement floor. The boards for the second layer were positioned on top of the first according to layout marks made earlier, and a quick measurement of column locations confirmed the layout. The two layers were nailed together according to the nailing schedule spelled out on the plan. The location and size of nails are details that must be followed to the letter. For this beam, four 16d nails were required every 16 in. and wherever a board bridges a seam, a row of nails must be driven on both sides of the seam.


When nailing two layers of lumber together with 16d nails, angle the nails so that they don’t go all the way through the other board. And as you nail the boards together, be sure to keep the layers flush at the top edge of the beam. Usually all that’s needed to align the edges is a hammer tap. If more force is required, drive a toenail into the misaligned board to draw the edge flush (see “Toenailing Boards Flush”).
When the third layer is nailed off according to the nailing schedule, carefully roll the beam over and nail through the back face as well, again nailing on both sides of any seam. As an added precaution against rot, nail a length of aluminum flashing around each end of the beam.

Setting the beam
The framing contractor on this project rented a rough-terrain forklift with a telescoping boom, a machine that makes moving lumber a breeze without straining anyone’s back. More common on West Coast building sites, a lift can be rented and easily pays for itself over the course of a project. Just make sure that anyone using it has been checked out thoroughly on its safe operation.
Before a beam is lifted into place, make temporary posts to support it until the Lally columns can be set. Each post is simply a pair of 2×4s nailed face to edge to increase stiffness. To determine the height of a post, stretch a string across the sills and between the beam pockets as tight as you can make it. Then at each temporary post position, set a scrap of 2×12 (the height of the beam) on the slab on edge and measure up to the string.


Assembling a Beam in PlaceA built-up beam can be assembled in place if it’s too long or too heavy to be lifted. Lay out, cut, and label all the pieces as described above. Starting from one beam pocket, assemble two layers of the beam and support them with adjustable A-frame trestles. Nails staggered every few feet or so are enough to hold the layers together for now. Continue assembly to the other beam pocket, placing trestles as needed for safe, solid support. When you’ve finished the first two layers of the beam, make the entire length parallel to a mudsill and hold it in position temporarily with 2×4s nailed to the plates. Then nail the two layers together according to the nailing schedule and add the last layer (or layers), checking frequently to make sure the top edges are flush, the beam is straight, and the top of the beam is in the same plane as the top of the mudsills. Many contractors use a transit to set the height of the beam, but it’s just as easy to stretch a length of mason’s twine between the mudsills and over the beam at every Lally column position.
|
When everything is ready, roll the beam upright onto blocks and make sure the top is facing up. Next, measure and mark the exact middle of the beam. Lifting chains can then be wrapped around the beam and positioned at equal distances from the middle so that the beam is perfectly balanced as it is lifted. Once the beam clears the foundation, carefully swing it into position over the beam pockets and lower it into position. When the beam is fully seated in the pockets, set the temporary support posts in place and tack them to the underside of the beam. Be sure to set the posts where they won’t interfere with the Lally columns later on.

Steel and LVL Beams
|
Fine Homebuilding Recommended Products

Protective Eyewear

Bluetooth Earmuffs

Guardian Fall Protection Pee Vee


