How to Fix Ice Dams
Ice dams are not a roofing problem; they’re an air-sealing problem.

Synopsis: In the winter, ice dams form on many homes in the northern part of the country, causing roof leaks. While ice dams are often attributed to poor attic ventilation, the more common culprits are air leaks and insufficient insulation. Senior editor Martin Holladay explains how ice dams form and how they can be prevented.
What do northerners from Maine to North Dakota call the period between Valentine’s Day and Easter? Ice-dam season, of course.
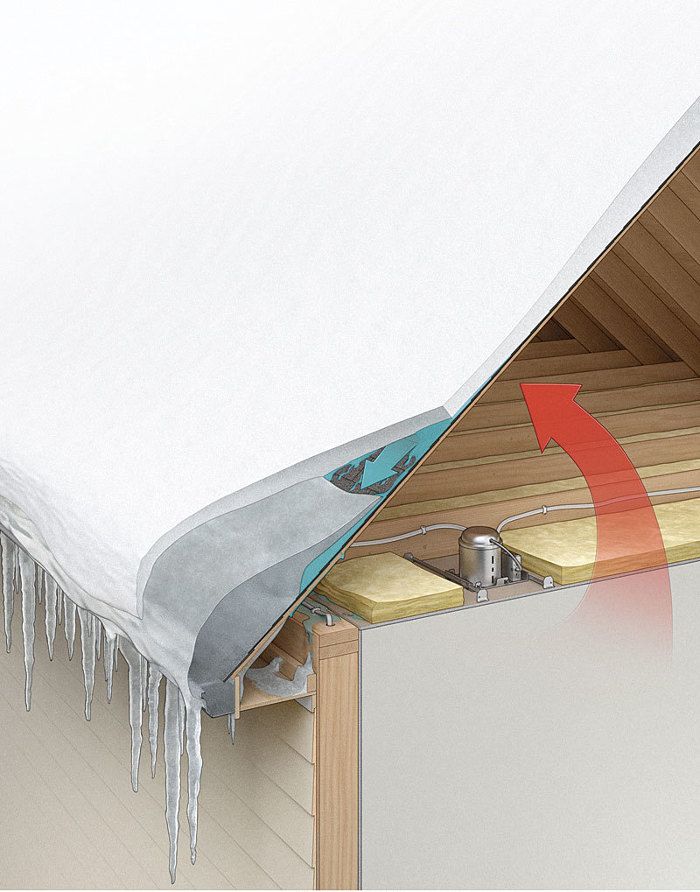
During snowy winters, many northern homes are plagued by ice dams, which form when escaping heat warms the roof sheathing and melts the underside of the snow layer on the roof. As the melted water refreezes at the eave, the resulting dam interferes with drainage. Water can then back up, get under the roofing, and lead to interior damage.
Although the impulse of many homeowners is to respond to a water leak by calling a roofer, leaks from ice dams are just a symptom of a larger problem that usually stems from air leaks or insulation defects. Sealing the roof eaves with flashing membranes adds extra insurance against ice dams. In a few rare cases, increasing the amount of roof ventilation may help. However, air-sealing the connection between the living space and the roof or attic and then improving insulation is usually the best way to solve the problem.
The best course of action is to ignore the contractors who talk about roof repair and ventilation improvements and instead find a home-performance contractor who knows how to identify air leaks using such tools as a blower door, an infrared camera, or a fog machine. But before you call anybody, it helps to have a good understanding of what causes an ice dam to form. Here’s how it works.
How to fix them
Ice dams are not a roofing problem; they’re an air-sealing problem. There are four possible ways to prevent ice dams, and they are best taken in order of priority. Step 3 shouldn’t be attempted until steps 1 and 2 have been addressed, and in many cases, not every step is necessary.
1. Seal air leaks. Canned spray foam, rigid air barriers, and/or sealants are your tools, and any gap, crack, or joint is your target. Seal gaps around recessed can lights, ceiling-mounted electrical boxes and duct boots, bath exhaust fans, plumbing vent pipes, seams between partition top plates and partition drywall, and holes drilled through top plates.
2. Add more insulation. Cellulose or fiberglass can be blown atop an existing layer of undersize or poorly installed fiberglass batts. If there isn’t adequate room under the rafters to reach full insulation depth, it may make sense to spray the underside of the roof with closed cell polyurethane insulation. Insulated sloped-roof assemblies (cathedral ceilings) are best addressed by installing one or more layers of rigid foam above the roof sheathing, followed by an additional layer of OSB or plywood sheathing and new roofing.
3. Improve ventilation. In the past, many building inspectors falsely concluded that the only way to stop ice dams was by improving ventilation, which they believed kept sheathing cold enough to prevent snow from melting. The truth is that increasing ventilation can help, but only after you’ve air sealed and insulated; otherwise, the increased ventilation will actually increase air leakage through the ceiling, bringing more heat than ever against the roof sheathing.
4. Install a waterproofing membrane. Although not a solution, self-adhering membrane on the eaves of the roof (a code requirement) is cheap insurance against ice dams that form due to unusual weather conditions.
 For more diagrams and to learn how ice dams form, click the View PDF button below.
Fine Homebuilding Recommended Products

Ladder Stand Off

Flashing Boot

Flashing Boot Repair


View Comments
Joe Lstibureck has pointed out that on south facing walls heat from the sun can get trapped under the eave as it rises from the wall, causing ice damns even on properly built roofs.