How to Precisely Lay Out Deck Footings
Use control lines to determine where to dig.

Determining where to dig a footing is fairly forgiving because if you are a little off, you can always adjust the hole. That said, locating the footing precisely saves on concrete because the hole will be the right size, instead of oversize.

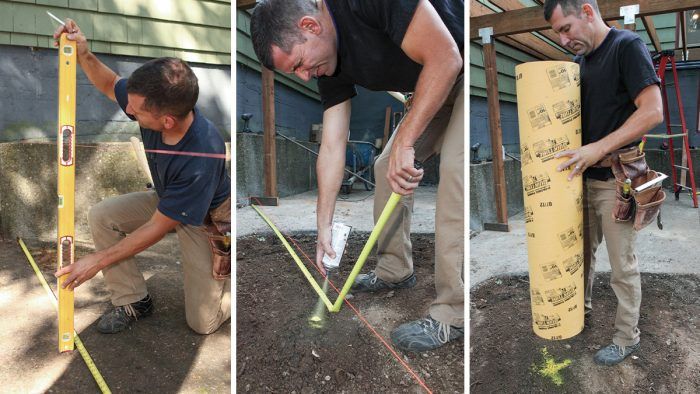
Locating footings under the control line takes only a few steps. If the grade is uneven or won’t take a chalkline, you’ll have to locate each footing separately 1. But if you’re working on a concrete slab (as shown in the photos), it’s easy to establish marks under the control line 2. Simply plumb down from each end, make a mark, and snap a chalkline between the marks 3. For each footing along the run, use the chalkline as a reference and mark its center 4. Then use that center point as a reference to measure the footing’s perimeter 5.
By now you might be asking why this level of meticulousness is necessary. After all, you’re just marking out a footing. It’s true that the process is pretty straightforward; however, getting it wrong has some pretty weighty consequences. First, if you happen to get a persnickety inspector, being off only 1 in. in footing size could mean the difference between a passed inspection and having to repour the concrete. Second, and more important, being laissez-faire about footing installation can lead to an inferior deck. The last step is to mark the footing’s perimeter by connecting the dots 6.
1. Locate each footing by measuring the distance and plumbing down with a level.

2. Mark plumb under the control line at each end to mark a run of footings.

3. Snap a chalkline under the control line to use as a reference to locate the footings.

4. Measure over from the chalkline to establish the center of the footing.

5. Measure the footing’s perimeter based on the calculations of footing size.

6. Mark the footing perimeter once the location and size are determined.

Locating footings on an uneven grade
Most of the time, footings will need to be installed in rough, uneven terrain. In this situation, the method for locating the footings is slightly less precise but faster. As with the method just described, you’ll use a string line for reference. The string should be set up so it’s plumb under the center of the beam. The string does not need to be set level; instead, place it as close to grade as possible so you can eyeball from the string plumb to the ground 1. Once all the footing positions are marked with an X, center a section of the appropriate-size footing form over the mark 2. Then use marking spray to outline the base of the form 3. After you remove the form, the outline of its location should be clearly visible 4. The hole you’ll dig needs to be about 2 in. larger than the outline on all sides 5. Mark the diameter of the hole. Notice that we made our markings square; you can make them round but we like to make them square and leave the outside corners to give us some points of reference as we dig 6.
1. Use a tape measure and string line to locate the center of the footing and spray a mark at that point.

2. Center the footing form over the mark to determine the outer perimeter of the finished form.

3. Mark the ground outside the footing form to give yourself a reference to mark the perimeter to excavate.

4. Check the center mark’s location in relation to the perimeter to make sure the form is placed where you want it.

5. Mark 2 in. outside the form’s perimeter to indicate the excavation line.

6. Complete the excavation perimeter by connecting the lines to make either a square or a circular outline.

Fine Homebuilding Recommended Products

Standard Marking Chalk

N95 Respirator

Drill Driver/Impact Driver

