Guide to Low-Slope Roofing
Learn the alphabet soup of materials, but first get the slope and underlying details right.

A good low-slope roof (3-in-12 pitch or lower according to the National Roofing Contractor’s Association, or NRCA)—rarely gets any attention. A bad one brings the kind of attention nobody wants. I see a lot of bad low-slope roofs and don’t know which is more astonishing: how little additional effort would have been required to build it right, or the extraordinary cost of correcting the roof and repairing the associated damage.
Karen L. Warseck, AIA, president of Building Diagnostics Associates, a Florida-based firm that specializes in identifying and fixing building-envelope problems, identifies the causes of roof failures in an Architect magazine article titled, “When It Leaks, It Pours”: “Normally we find that it’s about 60% to 70% construction, 20% to 25% design, and 10% materials.” In short, the roof is the wrong place to try to save money.
Always give water a hill to run downNo matter what kind of roofing material you choose, most roof details are similar. Roofs always need to slope, always need crickets at wide obstructions, and should include cant strips at intersections with vertical surfaces. Flashings are needed at all penetrations and terminations, and redundancy is a good thing. Always follow the roofing manufacturer’s specific instructions—after all, they’re the ones who will warrant the roof (or not). |
Though Warseck’s experience proves that the skill of the workers and the quality of the roof design are more important than the choice of materials, the first question I usually hear is, “What’s the best material?”
Well, the answer is, “It depends.” If there were one best roof for every application, we would have figured it out by now. Even standard asphalt roofing shingles can be used on roofs as low-sloped as 2.5-in-12, as long as the underlayment is installed in a double-coverage configuration. That simply means that there must be two layers of underlayment everywhere. So, instead of lapping a 36-in. underlayment the typical 2 in., the overlaps are 18 in. each.
For lower roof pitches, there are two broad categories of roofing: asphalt based and polymer based. But the best material choice depends on a variety of factors: location, weather, type of construction, intended use of the building, configuration of HVAC and rooftop equipment, anticipated foot traffic, foreseeable potential for damage, and ability to maintain the roof.
Asphalt-based roofing; old school with a few new tricks
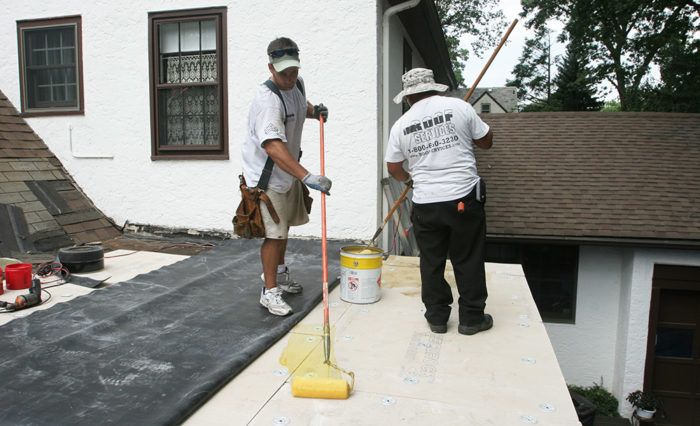
Most people are familiar with built-up asphalt roofing (BUR)—multiple plies of saturated felt or fabric applied shingle-style and layered with asphalt. The asphalt is melted in a big pot and pumped or bucketed to the roof and then mopped on. It is then covered with a cap sheet that has a mineral surface or a reflective coating (possibly acrylic, urethane, an asphalt-based emulsion—often with aluminum— or actual gravel carried up to the roof and spread by hand).
BUR showed up in the midto- late 1800s; the asphalt used was originally a by-product of petrochemical refining. By the 1970s, advances in refining technology and market pressures resulted in changes to the asphalt used for roofing. Meanwhile, in the felt, rag content decreased and asbestos fiber was phased out. The sense in the roofing industry was that these changes decreased the quality of BUR, and I see it less and less these days.
Unlike other options, BUR components are site assembled, and the finished product is heavily dependent upon the skill and diligence of the installer. BUR does not have as much ability to expand and contract without damage, it’s relatively heavy, and it’s not as durable under extreme swings in temperature as other options. It’s tough to inspect, maintain, find leaks in, and repair. It’s also no longer allowed in some high-wind areas, and tearing it off is a first-class mess. Once upon a time it made a good roof, but considering advances in the industry, I don’t know why I would ever use it now.
| New school meets old school. Asphalt roofing was originally bedded in molten tar, but newer versions include peel-and-stick membranes. |
Mod bit
To build an asphalt roof today, I’d go with a modified-bitumen product. Bitumen is an asphalt component that occurs both naturally and as a by-product of oil refining. For roofing, it’s modified with the addition of chemical plasticizers and stabilizers that enhance flexibility and durability. This so-called modified bitumen (mod bit) is reinforced with at least one layer of fabric (fiberglass is common, but there are several types) and usually comes in 3-ft.-wide rolls, with a thickness around 150 mils. In most cases, a cap sheet is installed over a mechanically fastened base sheet about half that thickness, but other installations are possible.
Mod bit was introduced to the U.S. in the mid 1970s and gained widespread acceptance quickly as an economical, high-quality roofing material. It has become very popular for its durability, resistance to damage, ease of repair, reliability, and standardized installation methods. different manufacturers and applications may dictate choices about number of plies and specific components, but the key to remember is that these are manufactured products of consistent quality with uniform, predictable properties and performance characteristics.
APP & SBS
There are variations in mod-bit products. Two common designations are APP and SBS, and they refer to the type of modifiers in the bitumen. APP is typically torched down, while some manufacturers also make products that are self-adhering. depending upon manufacturer and product, SBS is available for a number of applications: torched down, hot mopped, cold processed, mechanically fastened, and self-adhered. “Torched down” is just what it sounds like. First, a fireproof base sheet is laid. Some fasten mechanically with screws or ring-shank nails through metal plates; others self-adhere. As it’s unrolled, the underside of the cap sheet is heated with a torch until it melts, allowing it to bond to the base sheet and the seam of the previous course.
Because of the risk of fire during installation, insurance companies don’t seem to appreciate torch-down application, but it’s particularly handy on small or cut-up roofs, or where access is difficult. I have seen great results from torch-down applications, but you have to be thoughtful and careful, particularly at terminations of any kind, especially walls, curbs, parapets, and other details. Stay on the job for at least two hours to ensure there is no risk of fire, and a non-contact infrared thermometer is handy for locating any spots hotter than the ambient roof temperature that could indicate smoldering materials.
A hot-mopped application— that is, a cap sheet set in asphalt heated to a liquid state—poses less risk of accidental fire, but attention to detail and safety is still important, especially at penetrations of any kind, to make sure hot asphalt does not accidentally run into the building. Cold-process applications with unheated asphalt and self-adhering options (peel and stick) are safer and easier if you don’t have the specialized equipment or skill required for hot-mop or torch-down methods.
I prefer mod-bit roofing on jobs where mechanical damage to the roof is a possibility (for example, from foot traffic). Mod bit will take a lot of abuse and is easy to repair. It can be two to four times thicker than other membranes, providing stability and resistance to puncture. Mod bit is commonly surfaced with granules, but if a reflective roof is desired, acrylic or urethane coatings on smooth-surface mod bit can work well.
With some mod-bit membranes, the use of a base sheet is optional, but it’s money well spent. A base sheet separates the waterproofing membrane from the substrate, acting like a bond breaker to allow for slight thermal movement. It’s nailed to the roof deck with ring-shank cap nails or plates and screws, making future tear-off easier than with membrane directly adhered to the deck. A base sheet provides a reliable fastening surface for cap-sheet adhesives, and protects the cap sheet from joints and minor irregularities in the deck. It functions as a strengthening layer and in some cases as a vapor retarder, and it reduces the amount of asphalt dripping through the deck in hot applications.
Good roofs start with good design
Drainage is the single most important consideration in roof design. According to the article in Architect, “while roofs only make up about 2% of construction costs, water intrusion accounts for more than 70% of construction litigation.” Most of the problems I see relate to inadequate drainage, which can mean inadequate slope, a lack of crickets where needed, and drains that are not properly constructed or maintained.
We often hear low-slope roofs referred to as “flat roofs,” but no roof should be dead level. The closer a roof is to level, the more likely sagging rafters will make a pond. An adequately pitched roof with a sagging middle will still slope enough to drain. Codes prescribe a minimum slope of 1 ⁄ 4 in. per ft., while the NRCA calls for “no ponding water on the roof 48 hours after a rain during conditions conducive to drying.” Roofing manufacturers have their own requirements. It’s a good idea to become familiar with all three perspectives and build to the most restrictive.
It’s unusual for the field of a roof with adequate slope to leak. Penetrations, obstructions, terminations, drains, improper flashings—here is where trouble lies. Anywhere the designer has to lift the pencil is a potential leak. To avoid putting the roofer in an impossible situation, the designer and the builder need to provide structural support for all anticipated loads, adequate slope, a suitable surface for attachment (which varies depending on wind conditions), sound parapet configuration, smooth surface conditions at transitions and changes in elevation, adequate ventilation, and proper installation of the sheathing. All openings in the roof should be completed before the roofer shows up. In high-wind areas, I have increased the thickness of the roof sheathing to provide better fastener anchoring. It costs a little more, but I sleep better.
Talk before work starts and as needed during the job. Make sure the framer, plumber, electrician, HVAC contractor, and site superintendent are involved. Clear detail drawings are crucial—you don’t want the lowest-paid roofer on the job reaching for a tube of caulk because he doesn’t know what else to do.
Have the roofer review the drawings prior to construction and comment on curb heights, nailing surface for flashing, distance from walls for penetrations, and configuration and location of pipe penetrations. One of the ways I have been able to get a better product at no additional cost is to ask the roofer in advance what he needs to see when he shows up—blocking, nailers, curbs, crickets, even access details and material storage areas—anything that makes his life easier will make my life easier, too.
Polymer-based roofing; easy to clean, inspect, and repair
In cases where the roof is not subject to mechanical damage—say, by regular access required to maintain rooftop HVAC equipment —single-ply polymer-based membranes such as TPO, PVC, and EPDM are a terrific option. They are easy to clean, easy to inspect, and easy to repair in an emergency (although permanent repairs should be done by a professional certified in the manufacturer’s system). Polymer-based roofing is lightweight, which makes it a great choice for going over an existing roof, and installation is fast. It can be mechanically fastened, fully adhered to the roof deck, and, in rare cases, ballasted with gravel. When mechanically fastened, nails or screws and sheet-metal plates are used at the top of the sheet where the next layer will overlap them. This seam is then glued Polymer based roofing easy to clean, or taped. Attention to the manufacturer’s details is crucial, and it’s important to recognize that with single ply there are no redundant layers. If there is no insulation above the roof deck, an underlayment will be used to protect the membrane from the deck.
| One layer does the trick. TPO, PVC, and EPDM roofs fasten to the deck in a variety of ways and are highly reliable, but often require special tools and training to install. |
TPO & PVC
TPO and PVC are both fabricreinforced plastic materials. TPO is probably the most widely recognized. It was introduced in the 1980s and the version we’re familiar with today caught on in the early-to-mid 1990s. Some of the materials used in TPO and PVC have a bad rap as a result of early formulation troubles, but today these are highly reliable products. There is a wide range of characteristics for each material and brand, but for our purpose here, the most important feature is that everything outside of the fabric reinforcement is part of a sacrificial layer that deteriorates at a predictable rate. These materials range in thickness from 45 mils to 80 mils or more. Thinner membranes are generally cheaper, while thicker membranes are more puncture resistant and last longer. Generally I would go with a thickness of at least 60 mils. These products work particularly well and are highly reliable where severe daily temperature swings and intense solar exposure are considerations. Following mechanical fastening, the seams are hot-air welded, typically with a handheld heat gun or an automated cartmounted welder. One company, Sarnafil, makes a peel-and-stick version. Although other colors are available, TPO and PVC roofs are generally white, which helps to reduce summer cooling loads.
EPDM
EPDM is sometimes called “rubber roofing.” It was introduced to the U.S. in the early 1960s, and continues to enjoy great popularity . The dark color is regarded as a benefit in some parts of the country, particularly in northeastern climates where it absorbs warmth from the sun and quickly melts snow inspect, and repair and ice. Black roofs are not as desirable in the Southwest, but you can now get EPDM with a white surface. In my experience, black EPDM is more prone to damage from expansion and contraction and UV degradation under severe solar exposure than other single-ply membranes. Because the seams are glued or taped, installer skill and ambient conditions are particularly important, and while there have been improvements over the years, the seams tend not to be as strong as the welded seams of TPO and PVC. Available in widths up to 25 ft., EPDM can be a seamless roof.
I’ve worked on one ballasted EPDM roof, meaning the membrane is held in place with river rock. This is not an installation I recommend for residential use. It takes surprisingly long for the roof to dry out after a rain (and it’s difficult to find leaks or repair them), and removing the existing roof to replace it is about as difficult as you’d expect.
Good workmanship needs guidance
I don’t suppose many people show up for work planning to do an inferior job, but there is a lot we can do to help everyone do even better work. “Built to code,” or “That’s how we always do it,” simply isn’t good enough. Clear standards of quality and workmanship should be agreed on before the contract is signed, reviewed before the crew gets on the roof, enforced throughout the job, and proven in inspections upon completion. The manufacturer’s specifications and the NRCA Roofing and Waterproofing Manual should be referenced in your contract. This is how all parties can agree to standards that are impartial, relevant, achievable, and verifiable. The NRCA Roofing Manual provides excellent design details, but at $650 for a non-member, it’s not cheap. Fortunately, the manual is broken into four books, and for low-slope roof details you can buy the Membrane Roofing Systems book for $195—far less money than even the smallest leak will cost to fix.
For the past seven years, David Crosby was a public-sector project manager responsible for 2.5 million square feet of low-slope roof.
Editor’s note: If you want to learn how to build a deck on top of a flat roof, read the article Decking Over a Roof
From Fine Homebuilding #269
To view the entire article, please click the View PDF button below
Fine Homebuilding Recommended Products

Shingle Ripper

Flashing Boot Repair

Fall Protection


View Comments
I just signed up for Fine Homebuilding so I could get some ideas for a a long term solution for a 2/12 pitch roof that I have on our pool deck. I am quite disappointed at the lack of information in the article --- other than go buy the $195 Membrane Roofing Systems book!
Ditto. This article promises to decode the "alphabet soup" but doesn't. It frames the essential question, "What is the best material" but doesn't answer it. "It all depends" isn't at all helpful. HOW does it depend on "location, weather, type of construction, intended use..." etc. I'm trying to re-roof an old porch with a 1/12 pitch. How is telling me to have meetings with my roofer prior to construction remotely relevant?
There is a great deal more information and guidance in the PDF of the article than is shown here.