Frame a Strong, Stable Floor With I-Joists
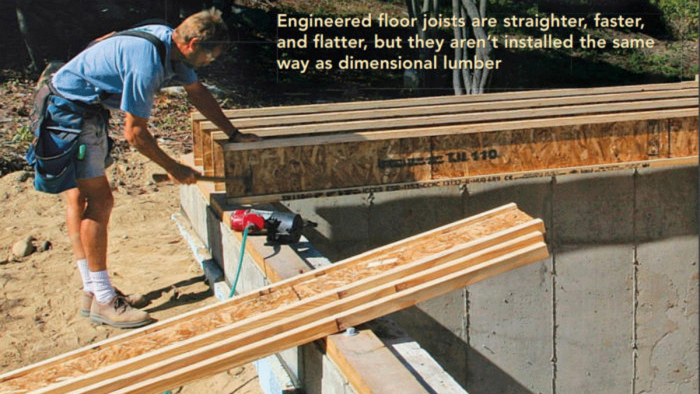
Engineered floor joists are straighter, faster, and flatter, but they aren't installed the same way as dimensional lumber.

Synopsis: When Rhode Island builder John Spier is getting ready to frame a floor, he doesn’t place an order for dimensional lumber. He calls in an order for I-joists. These engineered floors joists are pricier than regular lumber, but because they are straighter and flatter, they can be installed more quickly. That means big savings in labor costs. I-joists are a component of an engineered floor system, and they require a specific installation process and hardware, including joist hangers. After the joists are in place, a subfloor locks together the layout.
Manufactured I-joists are used in about 45% of new wood-frame construction, and that amount is expected to rise. I can’t remember the last time I framed a new floor with dimensional lumber. To me, I-joists make more sense. They are straighter, stronger, and lighter, and they span longer distances than ordinary 2xs. They are also a more-efficient use of resources because they can be manufactured using lesser-quality trees. Of course, I-joists cost a bit more, but they also are much easier to install, meaning I get a big savings in labor.
Then again, nothing is perfect, and I-joists have a few disadvantages compared to standard dimensional lumber. They don’t cope well with careless handling, they are more sensitive to moisture, and they shouldn’t carry any load until they are fully sheathed. They also aren’t as amenable to job-site change orders, and many lumberyards don’t stock them.
I-joists are part of a carefully planned floor system
With I-joists, system is the operative word. A floor framed with I-joists is designed as a package with all its components specifically located in the overall structure. This is different from conventional framing, where joist size is selected based on maximum span and then is used for an entire floor. In an I-joist floor, components have the same depth, but flange widths, joist spacing, and attachment details can vary throughout the system to make the most-efficient use of materials.
The first step in building an I-joist floor is having it designed. I provide lumber suppliers with complete sets of building plans, which they pass along to one or more engineered-lumber vendors. In a week or two, each vendor sends me floor-framing plans and quotes for the I-joists, beams, blocking, hardware, and other material.
It’s important to review the engineer’s floor-framing plans carefully, especially to make sure that they work with the builder’s plans. Sometimes the engineers miss a key element and design a framing plan that doesn’t accommodate the plumbing or the ductwork, or they might specify some details that experience has taught me to avoid. On the other hand, an engineer sometimes simplifies and improves the structure by coming up with a framing plan that I hadn’t envisioned.
I also review the attached materials list carefully. If the engineer has specified a lot of mixed, short-length pieces, I often combine them into longer lengths that can be cut to length on site. The longer lengths are easier to handle, reduce waste, and give me a margin for error if I make a cutting mistake later or find a damaged piece in the pile. Blocking panels, which are short lengths of joist used to transfer loads over bearing walls, are often listed as a pile of separate 2-ft.-long I-joists, but I can save myself some money by getting these short pieces out of cutoffs instead.
I also always buy one extra of the longest joist just in case; if I don’t use it, I can return it. I check the beams, too, because I often can combine them into continuous lengths that are stronger and can be installed faster. Finally, I check the hardware list. If the engineer has specified hardware items that I’m unfamiliar with, I look them up in the catalog to see how they are installed.
For more photos and information on how to frame a floor using I-joists, click the View PDF button below.
Fine Homebuilding Recommended Products

Speed Square

Sledge Hammer

Leather Tool Rig


