Dummy Rafter Tails
A useful technique for old-house remodelers and those who build alone.

Synopsis: This is a very short description of a very useful technique, applicable to new construction as well as the repair of decayed rafter tails on old houses.
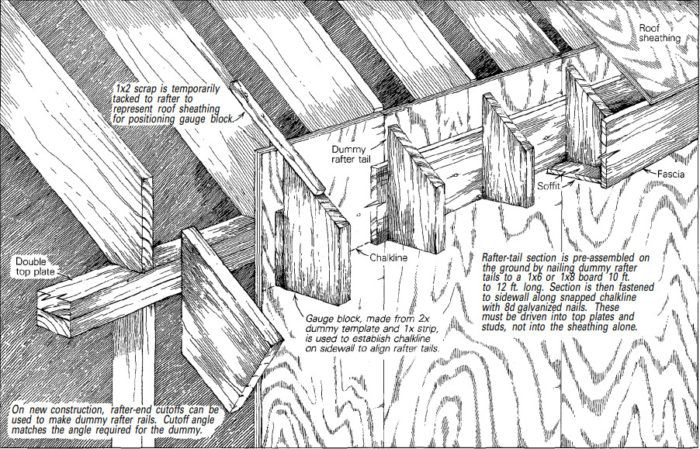
A leaky roof or a backed-up gutter often leads to eaves and rafter tails that are badly deteriorated. On older houses, there’s simply nothing solid to nail new fascia and soffit trim to. To deal with this problem, 1 cut the old rafter tails back flush with the siding, nail dummy 2×6 block rafter tails to a 1x board, and nail this in turn through the sheathing to the top plate, the cut-back rafter ends, or to both.
I’ve found that this dummy rafter-tail system also makes it easy for one person to nail up rafters on a new house. This procedure also eliminates the need to cut and install frieze blocks between rafters atop the plates. I extend the plywood siding 4 in. to 6 in. above the top plate, and it holds the bottom end of the rafter in place while I nail the ridge end. This sometimes lets me get away with using standardlength (20-ft. or less) rafter stock instead of having to special-order something longer. In these cases, I make up the blocks from the scrap lumber that’s all over the job site. When length isn’t a problem, I use cutoffs from the rafters themselves for the dummy tails. They’ve already got the correct angle cut at one end, so I have only to cut them to length and width.
Step by step
Not all framing material is a consistent width, so if I’m making up my dummy rafter tails from 2×6 stock, I begin by running the block stock through a table saw to make sure all the pieces are the same width. I cut as many rafter-tail blocks as there are rafters, then nail them to a 1×6 or 1×8 board. On a house 36 ft. long, I make up three 12-ft. sections for each side—longer lengths are too unwieldy.
To position the block strip, I use a gauge block made up of a rafter-tail block with a piece of 1x stock nailed to the back. I align the gauge block with the top of the rafter (on new construction, a 1×2 temporarily tacked to the rafter top to represent roof sheathing helps here), hold it against the sidewall sheathing, and mark the bottom. It’s best to mark both ends of the wall and the middle, then snap a line the full length. This will show up any variation that might have resulted from the guide marks having been taken off a high or low rafter. To get a good long-line snap, I thumb the middle of the line and snap each side.
Once the dummy rafter tails are in place, I install the roof sheathing over them, tying the whole business together. The end result is rafter tails that line up straight as string.
For more photos and information, click the View PDF button Below.
Fine Homebuilding Recommended Products

Flashing Boot

Stabila Classic Level Set

Hook Blade Roofing Knife


