Conceal Deck Board Ends
There are several ways of dressing up the exposed ends of synthetic decking.

I need some ideas for how to detail the exposed ends of deck-stair treads when using composite decking as the tread material. I usually hide the ends with a raised skirtboard, but on the next deck I build I plan to cut the skirtboards to match the stringer tread cuts and let the treads overhang a little. I’m using capped composite decking and don’t want the exposed ends to show because of the contrast between the core of the decking and the cap material and because the deck boards have grooves in the bottom that would look strange if left exposed. How can I detail the ends for a finished look?
—Mark Selden, Ithaca, N.Y.
Editorial adviser Mike Guertin replies: There are several approaches to dress up the exposed ends of synthetic decking. Some decking manufacturers offer touch-up or end-coating paint that matches the core material to the cap stock. Manufacturers of hollow-channel decking often have friction-fit caps that make the cut ends look like solid material. And some decking manufacturers and aftermarket fabricators offer colored end caps that stick onto the decking ends.
Alternatively, you can make your own decking end caps from scraps of the same decking material used for the treads. Begin by ripping 3/16-in. to 1/4-in. strips off the factory edges of solid-edge (nongrooved) decking. Cut them to the width of the deck boards, and then nail them to the ends of the decking treads with stainless brads.
The ends won’t have the radius profile, so you will have to sand or carve the eased edges. Site-made caps aren’t perfect, though, because the ends will still display a little of the core material color.
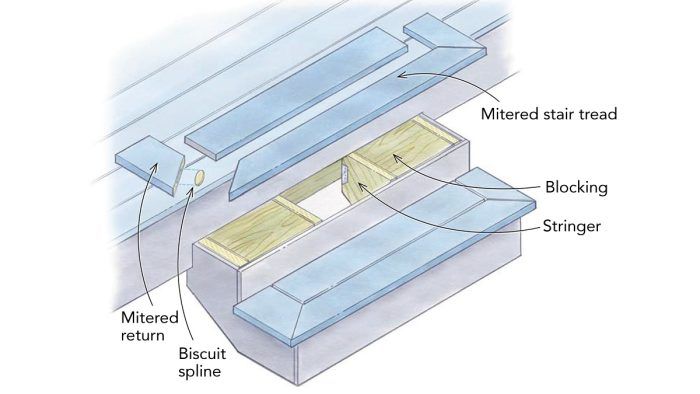
I often dress up the open-end treads with mitered returns. There are a couple options for mitered returns; I usually make a single return, which consists of a single center tread board surrounded by half a picture frame. To accomplish this, you’ll need to build extra framing into the stringer assembly to support the inside edge of the return tread pieces and the butt ends of the inner tread board. You can do this by adding an extra stringer that centers on the mitered joint, installing solid blocking between the outer stringer and the next inboard stringer (as shown in the drawing), or installing a subtread board across all the stringers.
If you want tight miter joints, you’ll need to spend extra time assembling them to ensure they stay tight for a long time. Synthetic decking expands and contracts thermally, which stresses the joints. And since the stairs are exposed to the weather, the wood framing beneath moves with moisture-content changes. This adds up to a challenging environment for the miters.
Some deck builders claim to make successful fastened miter joints with adhesives recommended by the manufacturer. I’ve found that while adhesives may hold a joint together for a couple years, they don’t last. For a more durable miter, you could use splines, biscuits, or other alignment keys to keep the tops of the boards flush and help support the joints. For more-solid deck boards, pocket screws driven on the underside of the decking will help hold miters tighter longer. Or you could use a combination of all of these methods.
If you’re building in a wet, humid region, you may be concerned about trapping water between the bottom of the decking treads and the subtreads or solid blocking. For extra moisture protection, apply flashing tape over horizontal framing surfaces on the stringer tread cuts and over any solid blocking, or over the subtreads.
Drawing: Dan Thornton
From Fine Homebuilding #320
RELATED STORIES
Fine Homebuilding Recommended Products

4-Gallon Piston Backpack Sprayer

Cepco BoWrench Decking Tool

Angel Guard Deck Demon


