Air-Sealing a Basement
Learn the places where cold air is most likely to leak in during the winter and how best to seal them.

Once you’ve sealed the air leaks in your attic floor—the cracks where warm air escapes from your house during the winter—it’s time to turn your attention to the basement or crawlspace, where cold air leaks in. If you turn off the basement lights and look for daylight, you might be surprised to find some large holes.
Weatherization contractors often use a blower-door test to help pinpoint leaks in the building envelope. Once your house is depressurized, you can use your bare hands to feel for air infiltration. The most common places to find air entering basements are around windows and doors and between the concrete foundation and the mudsill. But some air-leakage paths may surprise you: Air can even seep through the crack at the perimeter of your basement slab or through a sump in the basement floor. Here are five places to check for air leaks in your basement and some advice on how best to seal them.
Foundation walls
Walls made of poured concrete or concrete blocks are usually fairly tight. However, if your basement walls have any obvious cracks, fill them with silicone caulk. If the walls are made of stone and mortar, don’t use canned spray foam or caulk to seal cracks. Instead, remove any loose material from these areas, and repair them with mortar and small stones.
Use caulk or canned spray foam to seal leaks near wall penetrations for your electrical service, water service, cable service, or natural-gas service. Your home also may have penetrations for a fuel-oil filler pipe, an oil-tank vent, or a clothes-dryer vent. If basement access is awkward, some cracks may be easier to seal from the exterior.
Combustion safety
In a tight basement Atmospherically vented appliances—for example, water heaters, furnaces, or boilers attached to old fashioned brick or metal chimneys—depend on air leaking through cracks in your walls to supply combustion air. If your basement is very tight, atmospherically vented appliances could be starved for air, and exhaust gases may struggle to exit through the chimney. That’s why the best appliances for tight homes are sealed combustion appliances equipped with ducts that supply outdoor air directly to the burners.
Because flue gases sometimes include carbon monoxide, it’s always important to be sure that your combustion appliances have adequate combustion air and that your chimneys draw well. If you plan to seal cracks in your basement, arrange for a combustion-safety test of any atmospherically vented appliances once air-sealing work is complete. Contact your gas utility or a home performance contractor certified by RESNET or BPI for more information on combustion-safety testing.
Rim joists
Air can leak through the crack between the top of the foundation wall and the mudsill, the crack between the mudsill and the rim joist, and the crack between the rim joist and the subfloor. The best way to seal leaks in the rim-joist area is with a high-quality caulk.
Once these cracks are caulked, you may want to reduce air leaks further by installing a layer of closed-cell spray foam at the rim-joist area using a two-component spray-foam kit. (See “Spray Foam for the Rest of Us,” FHB #221.)
Although spray foam is effective, it is expensive and sometimes messy. If you would rather not use it, you can insulate rim joists with rectangles of 2-in.-thick rigid foam (polyisocyanurate or extruded polystyrene). Seal the perimeter of each foam rectangle with caulk or canned spray foam. Don’t use fiberglass batts; they do nothing to slow airflow.
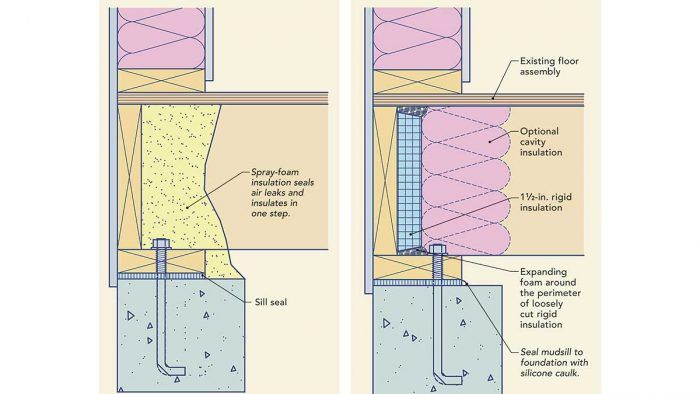
Two ways to air-seal and insulate a rim joist Rim joists are a common source of air leakage in basements and are often left uninsulated. The first step toward an energy-smart rim joist is to caulk gaps between the foundation wall and the mudsill, the mudsill and the rim joist, and the rim joist and the subfloor. As seen in the details shown here, you then can use rigid foam or spray foam to add another layer of air-sealing and to insulate the area.
Rigid foam
You can cut the pieces of rigid foam roughly and somewhat undersize because the perimeter of each rectangle should be sealed in place with canned spray foam. With the rim joist air-sealed and covered with rigid foam, you can now add cavity insulation like fiberglass batts or, better yet, a second layer of rigid foam.
Spray foam
Extend spray foam from the top of the foundation wall to the underside of the subfloor above. In addition to sealing leaks, 2 in. of cured foam will insulate to R-13. Most building codes, including the International Residential Code, allow spray foam installed at rim joists to remain exposed—without protection from a thermal barrier like drywall—as long as the foam is no thicker than 3-1⁄4in.
Windows and doors
If your basement has old single-pane windows, they may need new glazing compound and weatherstripping. If the windows are in bad shape, consider replacing them with new double-glazed units.
If you rarely open your basement windows, consider sealing them shut with screws and caulk, or even covering them with rigid foam. (Of course, this advice applies only to small basement windows, not to any egress windows in a basement bedroom.) Don’t forget to caulk between the window frame and the concrete.
Every bulkhead entry needs a tight, weatherstripped exterior door at the base of the stairs. Be sure to caulk or to foam the gap between the door jamb and the foundation. If the door is warped or difficult to weatherstrip, it’s time to replace it. Most lumberyards can order a custom insulated entry door to fit any size opening. If you’re framing the rough opening, use pressure-treated lumber, and seal the frame to the concrete with canned spray foam.
Basement floors
After a new foundation is backfilled, the fill often shrinks away from the foundation, leaving a gap next to the basement wall that allows outdoor air to reach the footings. That’s one way for outdoor air to enter a home through cracks in the basement floor or sump pit. Even if a home has no shrink-age gap, air can still reach the footings, especially in areas with porous soil.
If there’s a crack at the perimeter of your basement slab, clean the crack with compressed air or a vacuum cleaner, and then fill it with caulk. If you have a sump pit without a tight lid, replace it with a new airtight lid. Sumps that have airtight lids are available from Jackel.
Basement ceilings
Chases and chimneys that extend from the basement to the attic should certainly be capped at the top, but the bottom of these chases should be sealed as well. After all, once air gets into a chase, it can move sideways into joist bays and partition walls until it finds an exit crack. This belt-and-suspenders approach is the best way to prevent the stack effect from stealing your home’s heat.
Cover large ceiling holes with plywood, drywall, or rigid foam, and seal the edges with caulk, spray foam, or housewrap tape. While you’re at it, check for holes under first-floor bathtubs or showers. Plumbers typically cut out a big piece of the subfloor to accommodate drain lines and traps; these air pathways should be sealed.
Test for radon
Radon is a colorless, odorless, naturally occurring gas that can seep through soil into your basement. High radon levels can damage human health. While most homes have relatively low radon levels, some have dangerously high levels.
Sealing cracks in your basement can affect radon levels in your home, either for better or worse, depending on several factors. If necessary, a radonremediation contractor can install plastic pipes under your basement slab to lower the radonto safe levels.
The best way to determine whether your home needs radon-remediation work is to test the air in your home. For more information on radon testing and remediation, visit http://epa.gov/radon.
For details on radon mitigation, see GreenBuildingAdvisor.com/radon.
Drawings: Steve Baczek, Architect
 To read the entire article, please click the View PDF button below.
Fine Homebuilding Recommended Products

Disposable Suit

Respirator Mask

Great Stuff Foam Cleaner


