A Crash Course in Roof Venting
Building scientist Joseph Lstiburek explains when to vent your roof, when not to, and how to execute each common roof-venting approach successfully.
 So much information has been devoted to the subject of roof venting that it’s easy to become confused and to lose focus. So I’ll start by saying something that might sound controversial, but really isn’t: A vented attic, where insulation is placed on an air-sealed attic floor, is one of the most underappreciated building assemblies that we have in the history of building science. It’s hard to screw up this approach. A vented attic works in hot climates, mixed climates, and cold climates. It works in the Arctic and in the Amazon. It works absolutely everywhere—when executed properly.
Unfortunately, we manage to screw it up again and again, and a poorly constructed attic or roof assembly can lead to excessive energy losses, ice dams, mold, rot, and lots of unnecessary homeowner angst.
Here, I’ll explain how to construct a vented attic properly. I’ll also explain when it makes sense to move the thermal, moisture, and air-control layers to the roof plane, and how to detail vented and unvented roofs correctly.
Theory behind venting

The intent of roof venting varies depending on climate, but it is the same if you’re venting the entire attic or if you’re venting only the roof deck.
In a cold climate, the primary purpose of ventilation is to maintain a cold roof temperature to avoid ice dams created by melting snow and to vent any moisture that moves from the conditioned living space to the attic. (See “Energy Smart Details” in FHB #218 for more on ice dams.)
In a hot climate, the primary purpose of ventilation is to expel solar-heated hot air from the attic or roof to reduce the building’s cooling load and to relieve the strain on air-conditioning systems. In mixed climates, ventilation serves either role, depending on the season.
Vent the attic
A key benefit of venting the attic is that the approach is the same regardless of how creative your architect got with the roof. Because the roof isn’t in play here, it doesn’t matter how many hips, valleys, dormers, or gables there are. It’s also easier and often less expensive to pile on fiberglass or cellulose insulation at the attic floor to hit target R-values than it is to achieve a comparable R-value in the roof plane.
The success of this approach hinges on the ceiling of the top level of the house being absolutely airtight before any insulation is installed. (See “Attic-Insulation Upgrade” in FHB #200.) It’s also important to ensure that there isn’t anything in the attic except lots of insulation and air—not the Christmas decorations, not the tuxedo you wore on your wedding day, nothing. Attic space can be used for storage, but only if you build an elevated platform above the insulation. Otherwise, the insulation gets compressed or kicked around, which diminishes its R-value. Also, attic-access hatches are notoriously leaky. You can build an airtight entry attic, but you should know that the more it is used, the leakier it gets.
How do people get this simple approach wrong? They don’t follow the rules. They punch a bunch of holes in the ceiling, they fill the holes with recessed lights that leak air, and they stuff mechanical systems with air handlers and a serpentine array of ductwork in the attic. The air leakage from these holes and systems is a major cause of ice dams in cold climates and a major cause of humidity problems in hot climates. It’s also an unbelievable energy waste no matter where you live.
Don’t think you can get away with putting ductwork in an unconditioned attic just because you sealed and insulated it. Duct-sealing is faith-based work. You can only hope you’re doing a good-enough job. Even when you’re really diligent about air-sealing, you can take a system with 20% leakage and bring it down to maybe 5% leakage, and that’s still not good enough. With regard to recessed lights and other ceiling penetrations, it would be great if we could rely on the builder to air-seal all these areas. Unfortunately, we can’t be sure the builder will air-seal well or even air-seal at all. So we have to take some of the responsibility out of the builder’s hands and think of other options.
In a situation where mechanical systems or ductwork has to be in the attic space or when there are lots of penetrations in the ceiling below the attic, it’s best to bring the entire attic area inside the thermal envelope. This way, it’s not as big a deal if the ceiling leaks air or if the ducts are leaky and uninsulated.
Vent the roof deck
 If the attic space is going to be conditioned, either for living or mechanical purposes, or if a home design calls for a vaulted ceiling, provision R806.3 in the International Residential Code calls for the roof deck above the space to be vented continuously from the eave to the ridge. This is easy to accomplish in simply constructed roofs and difficult, if not impossible, to accomplish in roofs that have hips, valleys, dormers, or skylights that interrupt the rafter bays.
If you choose to vent the roof deck, then be serious about it and really vent it. The code calls for a minimum of 1 in. of airspace between the top of the insulation and the back of the roof sheathing. That’s not enough. For best performance, the airspace in the vent chute should be a minimum of 2 in. deep. Unless you’re bulk-filling rafter bays between 2×10 or 2×8 rafters with closed-cell spray foam, this approach will likely require you to fur out the rafters to accommodate additional insulation to achieve desired R-values. That can be a pain, but you won’t run into the problems associated with having too little air circulating under the roof. To be sure your roof is getting enough ventilation, there are simple calculations that you can follow.

Beyond the decreased capacity for insulation when venting the roof deck, venting the roof deck or the attic has some other drawbacks worth considering. In cold climates, snow can enter the soffit and ridge vents, melt, and potentially cause rot. Similarly, in coastal environments or in regions with lots of rain and wind, moisture can be forced into the vents and into the roof assembly. In hurricane-prone zones with frequent high-wind events, vented-soffit collapse can pressurize a building, which can cause windows to blow out and the roof to be blown off. Finally, in wildfire zones, floating embers can enter the vents and cause roof fires. If any of these issues are of concern, there is another option.
Create an unvented roof
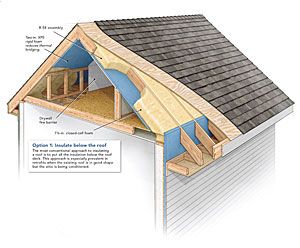
 Through provision R806.4, the IRC also allows you to build an unvented roof assembly. Unvented assemblies work particularly well on complex roofs that would be difficult or impossible to vent properly or on roofs where it would be difficult to insulate properly if the roof were vented.
It should be noted, however, that in high-snow-load areas, you still need a vented over-roof to deal with ice damming. In essence, you’re creating a hybrid vented/unvented roof system.The goal in an unvented roof is to keep the roof deck—the principal condensing surface in roof assemblies—sufficiently warm through the year to prevent condensation from occurring. In most climates, builders have to insulate the roof sheathing to prevent condensation from occurring within the assembly. The exception is hot-dry climates such as in Phoenix, where condensation isn’t as big an issue.
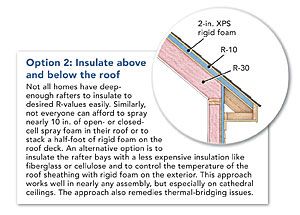
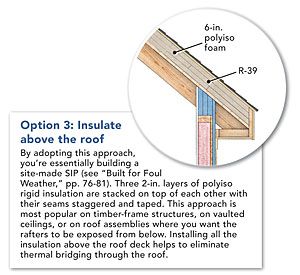
Condensation control is most often accomplished by installing rigid foam above the roof deck or by installing air-impermeable spray-foam insulation directly against the underside of the roof deck. The code also allows for air-permeable insulation, such as fiberglass or cellulose, to be used under the roof deck as long as rigid foam is used above the roof sheathing. Flash-and-batt (or flash-fill) assemblies are also allowed. Any of these approaches can adequately prevent condensation from occurring within the roof when the rigid foam or spray foam is installed at the appropriate thickness.
If you’re spraying foam on the underside of the roof deck, be sure you’re using the right product. Closed-cell spray foam works in all climates, but especially well in climate zones 5 through 8, where high R-values are desired and where air-impermeable insulation also must be a vapor retarder. Low-density, open-cell foam is permissible, but in climate zones 5 and above, it has to be covered with a vapor-retarder coating, like rigid foam or painted drywall.
Also pay attention to roofing materials. Asphalt shingles require special attention when installed on unvented roof assemblies in hot-humid, mixed-humid, and marine climates due to inward vapor drive. To keep moisture out of the roof assembly, a roofing underlayment with 1 perm or less (class-II vapor retarder) must be installed under the shingles. Also, check to be sure that you are in compliance with the manufacturer warranties when installing shingles over an unvented roof in all climates. Some manufacturers don’t warranty or offer only a limited warranty when their products are used over an unvented roof assembly.
Shingles that are installed on unvented roof assemblies operate at slightly higher temperatures, roughly 2°F to 3°F warmer than shingles on vented assemblies. This can reduce their service life by roughly 10%. You can vent the roof cladding, which will increase its longevity, but the expense of fastening battens over the roof sheathing, then adding another layer of plywood over the battens as a nail base for the shingles, may not be worth the expense. After all, the shingle color and the roof orientation are much more significant concerns when it comes to shingle life.
Prevent condensation with the right amount of insulation

An unvented roof assembly is possible only if you keep the roof sheathing warm enough to prevent conditioned air from condensing against it. The map at right, which is based on table R806.4 of the IRC, lists the minimum R-values required to prevent condensation in unvented assemblies in various climate zones. The thickness of the insulation will vary depending on the type. These R-value requirements are intended only to prevent condensation and don’t supersede the code-required R-values for energy efficiency, which are also listed.
Extra Credit: Site-built or prefab baffles?
The success of a vented attic or roof deck relies on its airtightness. The space above the top plate of exterior walls—at the bottom of each rafter bay—is especially important. Baffles placed in this area channel intake air into either the attic space or vent chutes, and also prevent insulation from falling into the soffit and blocking airflow.
Site-built: 2-in. chutes and baffles
Cut 1-in.-thick rigid polyiso insulation into 2-in.- wide spacer strips, and glue them to the inside face of each rafter with a spray-foam adhesive like Pur Stick (www.todol.com). Cut the polyiso insulation to fit snugly in each rafter bay, and foam it in place against the spacer to create a 2-in. chute or baffle.
Size: Custom-cut polyiso foam
Cost: $23 per sheet
Source: Dow
Prefab: fast and functional
The AccuVent soffit insulation baffle is made of rigid recycled plastic. It’s more durable than other foam-based products and installs quickly with staples. These baffles should still be air-sealed with spray foam, but they’re a good option if you’re looking for a stock product.
Size: 41 in. by 22 in.
Cost: $1.68 each
Source: Berger Building Products
www.bergerbuildingproducts.com
Drawings: John Hartman
For more on roofs and ventilation, check out these videos:
For more photos, drawings, and details, click the View PDF button below. Click the Launch Slideshow button below for a related slideshow:
Fine Homebuilding Recommended Products
Flashing Boot Repair
Roof Jacks
Ladder Stand Off



View Comments
Can you increase the amount of venting as long as you balance then soffit and ridge vent? I did the math based on the equations in the article and got 3.4' of ridge vent (18 NAFV) for my new 320 sqft addition? This doesnt seem like very much when the ridge is over 20' long.
How does one vent a lower roof that has no ridge?